


How to Make a Propane Burner
Are you looking for an easy way to make an outdoor propane burner? Well, you are in luck as you can get all the DYI gas burner information you need here. There are many reasons why people turn to propane as opposed to charcoal. First off, dealing with charcoal can be quite messy. It also tends to be quite pricey, especially during winter. Propane, on the other hand, is clean, affordable and available throughout the seasons. It is thus a convenient option when compared to using charcoal.
There are many designs that you will find online, and they all have their advantages, based on the kind of burner you would like to build. The thing with this design is that it is an adaptation of what is online, with a few changes here and there, to make its construction all the more manageable. You will notice that it does not have a flared end which is common in many burners, owing to hammering upon heating. Thus, if you prefer to skip this step or you lack a forge to help you do this, you are lucky as it is not part of the stages.
You can use this burner in a furnace to melt materials such as copper for casting as it emits high temperatures. Now that you have the background as to this burner, we can get started on making it. Here's what you need to make a DIY gas burner:
Equipment
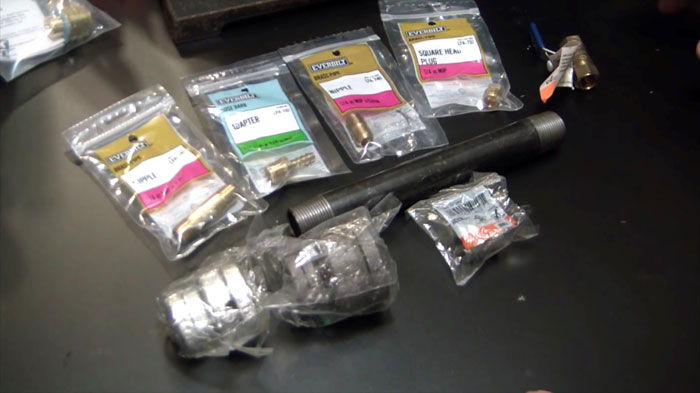
The first thing you need to do is to assemble all the parts that you will need. They are as follows: 1 ½ to ¾ inch steel reducer, ¾ inch 300 millimeters steel pipe with threaded ends, a one-inch steel pipe, a 1 ½ short threaded steel pipe and an (8*200) millimeters steel pipe. Note that all the steel pieces you use should be malleable. In addition to these parts, you will need some tools as follows: a drill, a hammer, a center punch, a one-millimeter drill bit, a propane gas bottle, a high-pressure propane regulator, a hack saw and protection gear (gloves and goggles.) If you cannot find a hack saw, you can use any other kind which can cut through steel.
Design
The working of this burner will be such that there will be a reducer on one end with a pipe running in between such that it opens on the other end, thereby creating a vacuum. This operation, which goes by the name 'the Venturi effect,' allows the drawing of air from the back and it ensures that the gas burns effectively. The purpose of this design is to enable you to have a blue flame that is devoid of yellow flames. The presence of the latter is indicative of incomplete combustion, and it results in less heat as compared to a blue glow. Here is something that can help you if you wish to have a hotter flame than the one this burner will give: you can flare the end. However, flaring or the lack thereof will depend on how you plan on using the propane burner.
Preparation
You can now start working on the pipes to get rid of any parts that will not be necessary for the assembly. For the one inch pipe, you need to cut off the end as this will serve as the burner's nozzle. For the 1 ½ inch pipe, you will cut the end which you will use to position the gas pipe in the reducer. Thus, be sure to keep it safe as you discard the cut ends. If any other cuttings need to take place, this is the best time to do it, so that you can move to the gas pipe and the reducer.
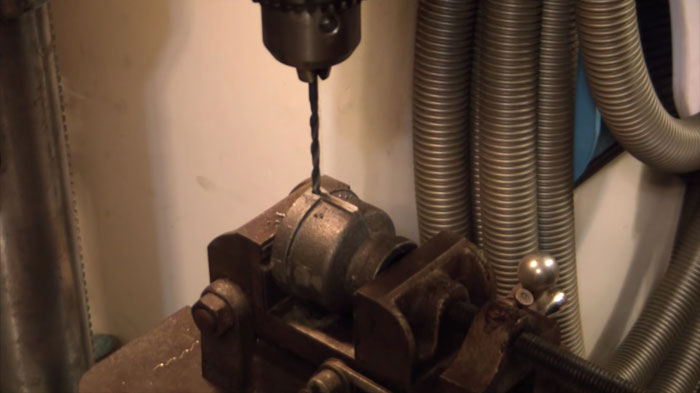
Take the eight millimeter pipe and weld one end such that it closes. In this way, the gas will not escape. Alternatively, you could use an end cap. Next, measure the length of the reducer from that end and mark it on the eight-millimeter pipe. Now measure half of the diameter and drill a one-millimeter hole. It is important to note that drilling into metal is often burdened with slipping of the bit so you can use your hammer and center punch to make a wee bit dent where you intend to drill. Also, the small drill bits tend to snap with ease, and you thus need to handle them with care.
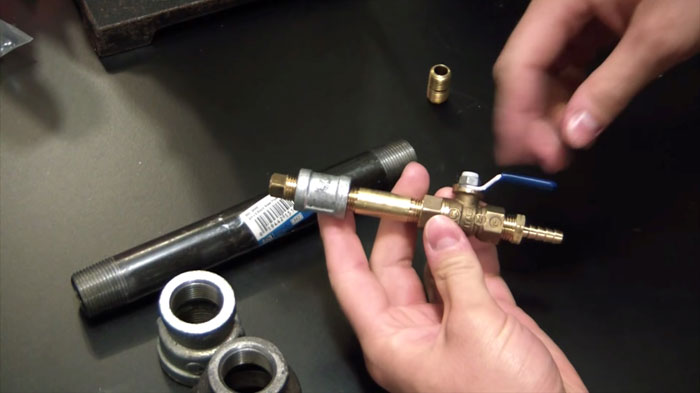
Having some ridges on the eight-millimeter pipe comes in handy regarding positioning. You want it to be secure once you clamp the gas line, lest it could pop off owing to the pressure. You can use a bench grinder or other tool to make some dents on it. From here, make eight-millimeter holes on both sides of the reducer to create a space through which the feed pipe can pass. Ensure that it goes down enough to allow you access to some of the inside thread which you will then use for piping to position the gas feed.
Your work is almost over, and all that remains is the assembly process. The eight-millimeter pipe should have a hole in which you can screw in the 1 ½ inch end that you cut off during preparation. You can do this by hand if you wish as the aim is to position the pipe. You can now screw the reducer to the ¾ inch pipe before sliding the one-inch pipe at the end. You do not need to use much force in this process and using a hammer could render the pipe stuck. The hole in the eight-millimeter pipe should be such that it faces down the length of the burner.
With the assembly out of the way, you can now connect the gas to the feed and turn it on at low pressure. Be careful as you do this and light the gas using a long lighter. The flame will be yellow at first, and as you increase the amount of gas, the color should turn blue. Note that too much pressure will result in the gas blowing itself out, which is pretty standard. Where you are unable to achieve a blue flame, you can loosen the feed and change the direction of the hole such that it points towards the burner's wall a bit as this will allow mixing of the gas with air. All the best!
Author's bio: Born in 1971, in Farmington, MI, Jessica grew up in a warm family environment. Her father is an Electrical Engineer and Inventor, and her mother is a Veterinarian, with two siblings and a very large backyard. Jessica runs her own blog where she writes about different home appliances.